Wednesday, October 24, 2012

Hand made Amy Tangerine inspired Day Book

As part of a swap recently I had to make a Day Book, having never made one and only recently seen one for the first time I was a little unsure but sure if you don't try...and all that mullarkey!
Cover with outer acetate 

inner pages

Close up of some of the pages, the recipient asked for grungey retro, there's always the fear in a swap that you aren't good enough and the person will be like "ehh thanks for this did your two year old son make this?"

An easy sturdy mini album

Excuse the lighting, I promise it will be better when my craft corner is installed....when...

What you will need:
Hoogie board (or something similar)
Scissors
Cardboard
Old coloured paper
ATG gun
bone folder

This took me about 40 minutes and should hold about 20 photos. I made it for a Christmas present so now just need to get the cardstock and cover it but the black makes a good background for it. Bad for tutorials but hey, you live and learn!
To make the cover:
2 pieces of corrugated cardboard (I used an old box) measuring 6 x7"
The inner piece measures 6 x 1 1/2"
Place two sheets of paper (I used a cheap A4 black paper pack) behind the cardboard, with the joining line running down the spine. To attach to the paper I ran a strip of tape down the middle of the join to keep the paper together. Cover all 3 pieces in glue and lay down, making sure there is a gap of about 1/2 " in between each piece like shown in the photo to make sure it can fold over. Cover the edges of the cardboard with glue and mitre the corners
To make sure you have enough room to bend the album, fold over before gluing down to see their is enough give in the cardboard.
Cut an A4 sheet in 1/2 and glue to the inside of the cover, ensuring you push the paper gently into the folds so the cover can open and close.
The finished album cover which can be adjusted to suit your needs and size.
This is the binding which measures 5 3/4"  and scored every 1 1/2".
You will need about 3 of these. When they are scored valley and mountain fold until you have a fan like shown in the photo.
This is all the pieces lined up, a tip I found useful was to use your bone folder on each fold and make it very flat.
When gluing the 3 pieces together I thought
 of it like putting the paper to bed, line it up so you know where the glue should go, attach glue to one side and to get it lined up straight put it on the side with no glue (left side on the photo) ensuring it is positioned correctly, put it to bed and fold the bend over like you are tucking it in. When you are finished you should have one continuous line of fanned paper.
Cut out about 10 pages of 5 3/4 x 6 3/4 " ( I don't get all these 3/4 measurements and my hoogie doesn't do 1/4's so I made it 1/2 instead) Attach one page to each left side of the valley fold, like in the photo.
To finish off the inside album I stuck each piece of the valley fold on the underside together so when it was finished it looks like a little book. Glue the first page to the front inside cover and the last page to the back inside cover and volia :)
Hope these instructions weren't too complicated and if you have any questions just ask me here!


Tuesday, October 23, 2012

Halloween tag-jibbery jabbery jaw

Oh Charles how you do crack me up :) A tag I made for a Halloween tag swap in lieu of waiting for my craft corner (which has been postponed until next week, I'm distraught :(  ) I stamped two Charles and cut out one of his jaws, adding little hinges to make his jaw move. Believe me when I say I played with this for at least an hour having a conversion that I thought he was a great listener.... it's been a long week.
Using the title from the Doors song, I added a glossy accented name badge to his bow tie (bow ties are cool don't you know). The background is actually awesome but Charles big head is covering it up, I used Dylusions stensils and distress inks. In each corner I pushed modelling paste through the stencil to give it extra texture, loved running my fingers over it!
Once I added the googley eyes I knew it was a keeper and I hope Ann enjoys her time with Charles as I did :)
I might do a tutorial for my next tag, be interesting for me to see what I actually do because I never remember!

Friday, October 12, 2012

Cheer up grumpy britches

Just watch..and don't let the moment pass. PTI clouds and sun die and stamp, dylusions ABC stencil and scraps of paper just fitted into each other

Cheer up grumpy britches... is what I say to a face like this but in all fairness he was mid air when I took the photo after Phil threw him up!

Monday, October 8, 2012

GBCE makes

I was demoing for Create with Kate at GBCE in Athlone at the weekend, I got to play with some Amazing new things and had such a great time meeting loads of new people and old friends who I had never met!
Charles Warhol skull head

My altered bookmark arranged by Aideen Swaps, I swapped with Timi from Crafting Ireland who gave me a gorgeous bookmark

The new belljar die from Tim Holtz and Darcies Halloween stamps, I want Halloween to be longer so I can buy all these stamps

My new stash *strokes it frantically. All from create with Kate and I'm feeling over inspired at the minute so Im going to have a cup of tea with Charles!

Meet the new man in my life- Charles Bonehead

How I feel about Eli's surgery next week but completely ecstatic with my new stamps!

Charles stamped on shrink plastic on the right with a hole in his head and on the left, shrunk down and sooooo adorable

Made a quick little key chain, love the chink of shrink plastic when it's shrunk down

Playing around and making a background with the new dylusions stencils and distress inks

Charles felt a bit fruity

But decided it was a tag for a suit

Prima stamped balloon

Add another layer folded in half

The last layer I cut in half and added a strip of tape to finish off the balloon (can you see Charle's UTEE'd hat, he's so dapper!)
And this is the start of a beautiful relationship between me and Charles...

My double Halloween tag

When I say double I mean it's twice the amount of fun, you might only pay for one seat but you will only use the edgeeeee (I'm reading that in a super trucks demo voice). Inspired by the amazing Shelly Hickox during my semi insomniac nights I saw it and knew I had to try it! 
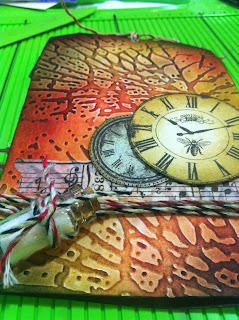
Using a large sheet of watercolour paper I cut out a tag 9 X 17cm folded in half and then trimmed it into shape, cut back biscuits and fizzy drinks and made it a lean double tag. I embossed, painted, sprayed and tickled until I got the right colour combo (BTW how fricking gorgeous is my crackle embossing folder), G45 clocks just snipped out and a little bottle filled with glitter attached with a string and spit.


When it opens I covered the back piece with the Holiday pack from Mr Tim and added the on the edge die cut graveyard and tree for a lovely gothicy look.
Charles was stamped and placed on a folded piece of card that's a highly guarded secret but I'll tell you if you ask. The happy halloween is from the same stamp set and tags cut out of it. I officially love that skull... thinking how to incorporate it into Amy's wedding invites.
I won the autumn challenge from Crafting Ireland at GBCE at the weekend with this tag, so woooooo!